
Before you begin, gather all the necessary supplies to remove your gel nails safely at home. Having the right tools on hand will make the process easier and help protect your natural nails from damage. Here’s what you’ll need for a damage-free gel polish removal :
100% Pure Acetone: The essential ingredient for dissolving gel polish. Regular nail polish remover (even acetone-based) often isn’t strong enough for gels . Look for 100% acetone at a drugstore or beauty supply. (Example: Onyx Professional 100% Acetone polish remover – available online or in stores.)
Cotton Balls or Pads: Used to hold the acetone against your nail. Cotton balls can be pulled apart to fit each nail. Lint-free pads are another good option.
Aluminum Foil or Nail Clips: Foil squares are used to wrap each fingertip and keep the acetone-soaked cotton in place . You can cut foil from your kitchen into ten small squares. (Alternative: reusable nail soaking clips or plastic food wrap as recommended by dermatologists for a tighter seal .)
Nail File (180 grit): A coarse nail file is needed to gently buff away the shiny top coat of the gel manicure . This “breaks the seal” of the gel, allowing acetone to penetrate more effectively.
Nail Buffer: A fine buffer can be used at the end to smooth the nail surface after removal. It’s optional but helpful for cleanup.
Cuticle Pusher or Orangewood Stick: To gently push off softened gel polish. A metal cuticle pusher works well, but be very gentle to avoid scraping your nail bed. (Avoid using a sharp tool or excessive force, as this can scratch or injure the natural nail .)
Petroleum Jelly or Cuticle Oil: Applying Vaseline (petroleum jelly) around your nails will protect your skin and cuticles from the drying effect of acetone . You’ll also use cuticle oil or a nourishing hand cream after removal to rehydrate your nails.
Towel or Plastic Wrap (for Surface Protection): Acetone can damage surfaces and has a strong smell. Work in a well-ventilated area and place a plastic bag or foil and an old towel on your table to prevent any acetone spills from harming your countertops .
Optional – Gel Removal Kit: If you plan to do gel manicures often, consider investing in a gel nail removal kit. Many kits include pre-cut foil wraps with built-in pads, acetone, a cuticle pusher, and other tools for convenience. (See our Best Gel Nail Kit for Beginners for recommendations on starter kits that come with removal accessories.)
With these items ready, you’re all set to remove your gel nail polish without a trip to the salon. Next, we’ll walk through the process step by step.
Follow these steps to safely remove your gel nails at home. Take your time with each step to ensure you don’t rush and accidentally damage your natural nails. Remember, the key is to let the acetone do the work — you should never force or peel the gel off aggressively.
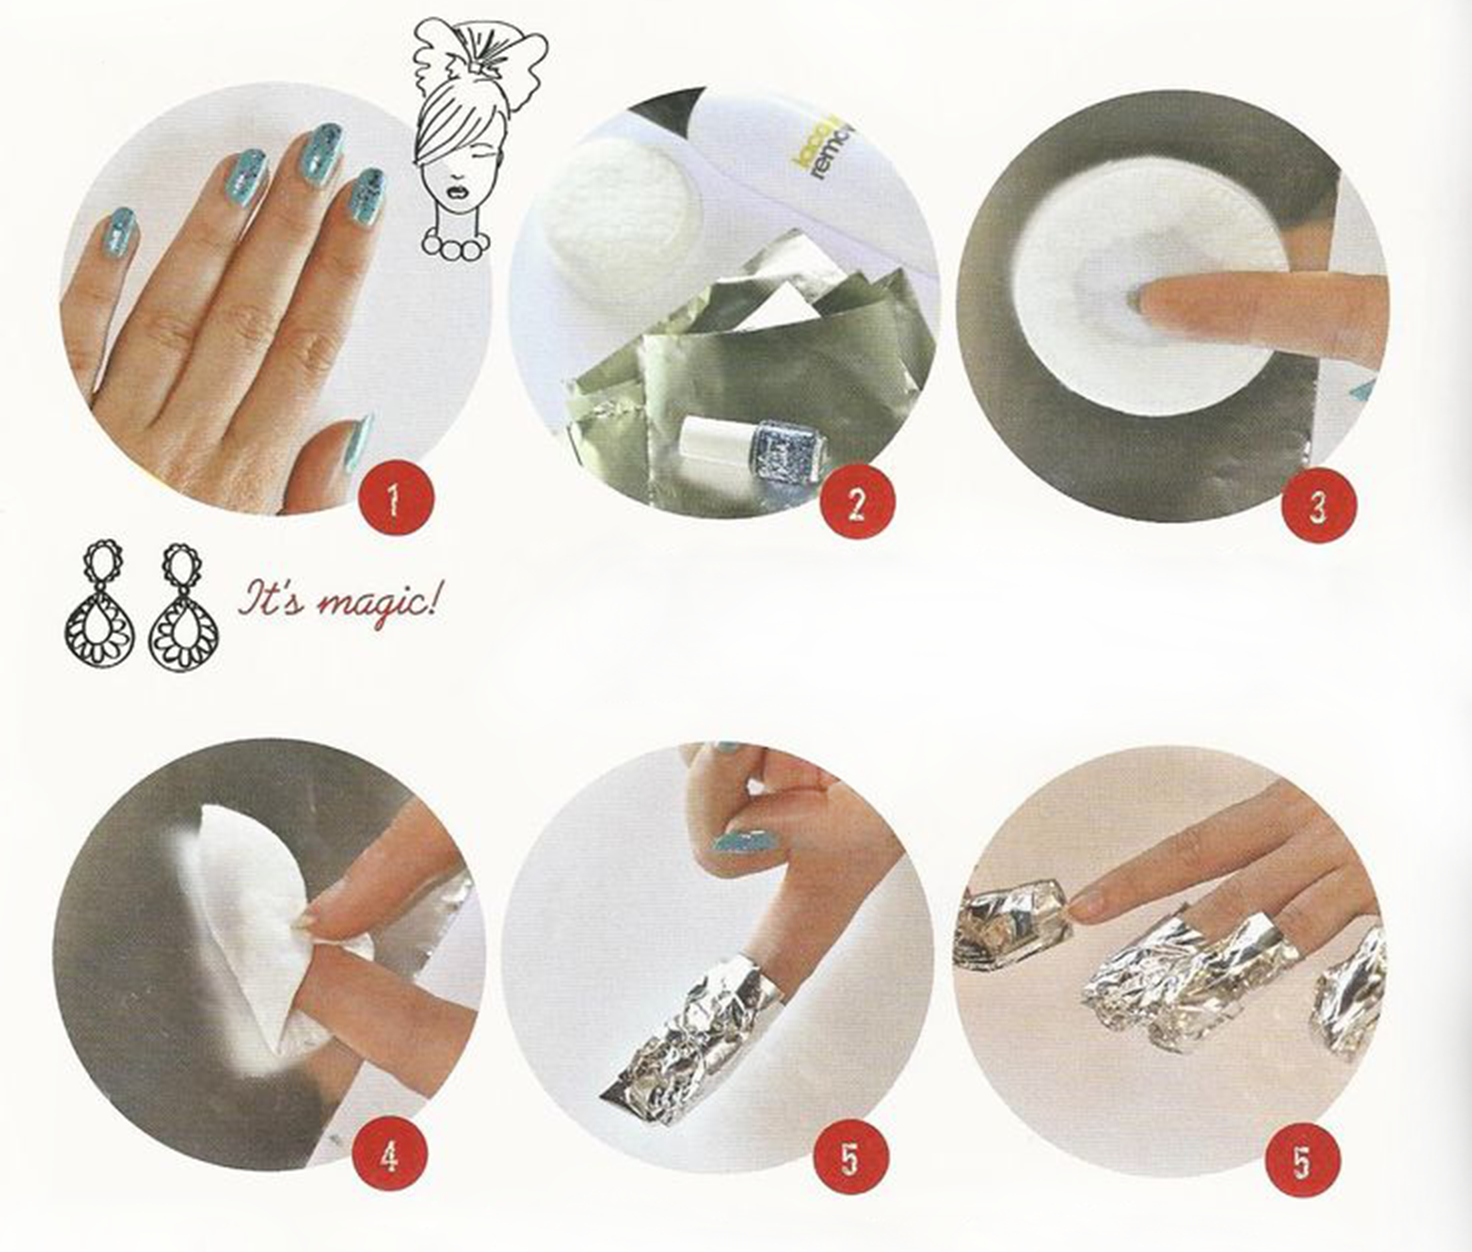
Set up a workspace with good ventilation (acetone fumes are strong) and protect it with an old towel or pads as mentioned. If you have long gel extensions, carefully trim them down first. Apply a thin layer of petroleum jelly around each nail, covering your cuticles and the skin beside your nails . This barrier will help shield your skin from the drying acetone. It’s also a good idea to work on one hand at a time – you can remove the gel from one hand completely before starting the other, which makes the process easier to manage.
Begin by gently filing the top shiny layer of your gel manicure. Use a coarse 180-grit nail file and lightly buff the surface of each nail until the gloss is gone. This step is crucial because the gel top coat is a tough, nearly impermeable seal that protects the color beneath . By roughing up that top layer, you allow the acetone to penetrate the gel polish more effectively. Don’t over-file – you only need to remove the shine, not file all the way down to your natural nail. Apply light, even pressure and keep the file parallel to your nail to avoid gouging the surface . Once your nails have a matte, dulled appearance, you’ve removed enough of the top coat.
Take a cotton ball or a strip of cotton pad for each nail (if using balls, you can tear them in half to make ten pieces). Soak each piece of cotton in 100% acetone – it should be saturated but not dripping. Place the soaked cotton directly on the surface of the nail, covering the gel completely. Next, take your small squares of aluminum foil and wrap each fingertip to hold the cotton in place . Wrap the foil snugly around the finger to create a secure pocket over the nail (you can pinch it at the tip to tighten, just not so hard that you cut off circulation). The foil wrap serves two purposes: it keeps the acetone-soaked cotton pressed against the gel, and it traps in heat from your body, which helps the acetone work more quickly . Tip: Wrap one hand at a time, so you still have one free hand to work with. If you have reusable nail-soak clips, you can use them in place of foil; otherwise, foil does the job cheaply and effectively. Once all fingers on one hand are wrapped, sit back and relax for a bit.
Patience is key at this stage. Let your wrapped nails soak in the acetone for about 10 to 15 minutes. For some gel formulas, it might even take up to 20 minutes for the polish to break down . Avoid the temptation to peek or remove the foil too soon – the acetone needs time to fully soften the gel. You can gently press on each foil wrap occasionally to help redistribute the acetone on the nail. After 10 minutes, test one nail by unwrapping the foil and wiping the cotton across it. The gel should look wrinkled or lifted and should come off easily when you wipe. If it’s still mostly intact or resistive, rewrap that nail and wait an additional 5 minutes. Remember, it’s better to soak a bit longer than to scrape forcefully. (Gel polishes vary; softer gel polishes may dissolve faster, whereas hard gel or builder gel can take longer .)
After all the gel polish is removed, your fingers will have acetone residue and possibly bits of dissolved gel. Wash your hands with mild soap and warm water to remove any remaining acetone and gel particles . Gently pat your hands dry (avoid harsh rubbing on those nails). Now, take a moment to reward your nails and skin for their patience: moisturize and rehydrate. Apply a nourishing cuticle oil to each nail and massage it into the cuticles and nail beds . If you don’t have a cuticle oil, a thick hand cream or even a bit of olive oil or coconut oil can help. This step is important because acetone significantly dries out your nails and surrounding skin by stripping away natural oils . Replenishing moisture will keep your nails flexible and prevent them from becoming brittle. For extra care, continue to apply cuticle oil or cream daily for the next week – your nails will thank you! Finally, if you’re not immediately applying new polish, you can lightly buff the surface of your nails with a soft buffer to smooth them out, and then finish with a coat of clear nail strengthener for added protection.
By following this step-by-step guide, you can successfully take off a gel manicure at home without wrecking your natural nails. But before you wrap up, let’s look at some common mistakes to avoid during the removal process.
Even with the right tools and steps, there are a few pitfalls that can cause nail damage. Make sure to steer clear of these common mistakes when removing gel nails:
Peeling or Picking Off the Gel: Resist the urge to peel off your gel polish like a sticker. We know it’s tempting, but peeling gel nails removes layers of your natural nail along with the polish, leading to thinning and brittle nails . This kind of damage can leave your nails weak and uneven, and they may take weeks to fully recover. Always remove gel with the soak-off method described – never by yanking or scraping it off with force.
Soaking Your Fingers in a Bowl of Acetone: You might have seen people literally dunking their fingertips in a bowl of acetone to remove gel. This isn’t the best idea. Prolonged submersion of your whole finger in acetone can severely dry out your skin and nail beds, causing irritation and white, chalky nails . It also wastes a lot of acetone. It’s much safer (and more efficient) to use acetone-soaked cotton on just the nail surface, secured with foil. This method focuses the solvent on the polish and minimizes skin exposure.
Skipping the Buffing Step: Make sure you lightly file the top coat before soaking. Failing to rough up that top layer is a common mistake that will make the rest of the removal much harder. The acetone won’t be able to penetrate the gel properly if the top coat is fully intact , meaning you’ll end up soaking longer or scraping harder – and risking damage. Take the extra minute to buff off the shine at the start.
Using Excessive Force (or Sharp Tools): Do not pry, scrape, or force the gel off with a knife, metal file, or other sharp tool. If the polish isn’t budging easily after the recommended soak time, reapply acetone and wait a bit more. Forcing it can gouge your nail plate or cause painful separation. Also, be cautious with metal cuticle pushers – they’re effective, but a heavy hand can dent your nails. Use a gentle pressure; the gel should slide off without aggressive scraping . Remember, gentle is the name of the game.
Overusing Acetone Without Aftercare: While acetone is necessary for removing gel, it can take a toll on your nails if overused. Using way too much acetone or soaking far longer than needed doesn’t really speed things up – it just dries out your nails and skin more . Stick to the 10-15 minute soak and check progress. And absolutely follow up with hydration: skipping cuticle oil or hand lotion after gel removal is a mistake. Unmoisturized nails can become brittle and more prone to breakage. Always rehydrate those nails post-manicure.
Using an Electric File/Drill (as a Beginner): Some tutorials show people using e-files to grind off gel polish. Unless you’re trained and extremely careful, don’t do this at home. An electric nail drill can quickly sand right through the gel and into your natural nail, thinning it out dangerously . This can cause pain, weaken your nails for months, and lead to irregular growth. It’s safer to stick to manual filing and soaking, which are gentler and have much less room for error.
By avoiding these mistakes, you’ll ensure that your DIY gel removal is not only effective but also nail-friendly. Removing gel polish the correct way might take a bit of patience, but your healthy, intact nails will be worth it! Now that your gel manicure is off, you might be thinking about what’s next for your nails. If you’re looking for inspiration or considering doing your own gel nails again, we have some great resources for you below.
Top 5 Gel Nail Ideas to Try This Season – Need inspiration for your next manicure now that your nails are gel-free? Check out these trendy and beginner-friendly gel nail designs to spark your creativity.
Best Gel Nail Kit for Beginners – Interested in doing your own gel manis at home? Learn about the best starter kits that include lamps, polishes, and tools to get salon-quality results right from home.
By following this guide on how to remove gel nails at home, you can keep your nails healthy and strong. With the right technique and a little patience, there’s no need to damage your natural nails when switching up your gel manicure. Happy polishing (and safe removing)!